
Beard Taper at Home: The 4-Guard Step-Down Method
Taper your beard at home with the 4-guard step-down method - drop one guard at a time for a clean low, mid, or high gradient without bowl-beard lines.
Written by Andre ColemanReviewed by Russell Hartley
Last updated on July 22, 2026
When you buy through links on our site, we may earn an affiliate commission (at no extra charge), which we use to fund new product tests. Learn more.
Summarize with AI
Most guys who wreck a beard taper make the same move: they treat it like a haircut and try to carve the gradient in one pass. It ends up as a hard shelf, a puffy top, or the dreaded bowl. The fix is almost boring.
Set your full length, then drop one guard number at a time down the sides, and the beard fades itself. That single change is what took our test panel from choppy edges to a clean blend, and it is the whole idea behind a beard taper you can do at home with two trimmers and ten minutes.
The 30-second answer. A beard taper is a gradient that blends your beard from full length at the jaw down to short or skin at the edges, softer and lower-contrast than a full fade.
You build it by setting a body length, then stepping the guard down one number at a time (for example a number four, then three, then two, then one) before finishing the skin edge with a zero-gap trimmer. Never skip a guard, and blend upward with a flicking motion to erase the lines. Yes, you can absolutely do it yourself.
Beard Taper vs. Fade: Which Should You Do?
A beard taper and a beard fade use the same blending idea, but they land in different places. A taper keeps some hair at the shortest point and blends gently, while a fade takes the edge all the way to skin for sharp, high contrast.
As Beard Sorcery frames it, the taper is quiet good grooming and the fade is a statement. For most men doing this at home, the taper is the safer, more forgiving choice, and it grows out gracefully instead of turning scruffy in days.
Across our six-week test in May and June 2026, the difference in upkeep was obvious. On the same tester, a mid taper still read clean at about three weeks of regrowth, while a to-skin fade looked fuzzy and uneven by roughly two weeks.
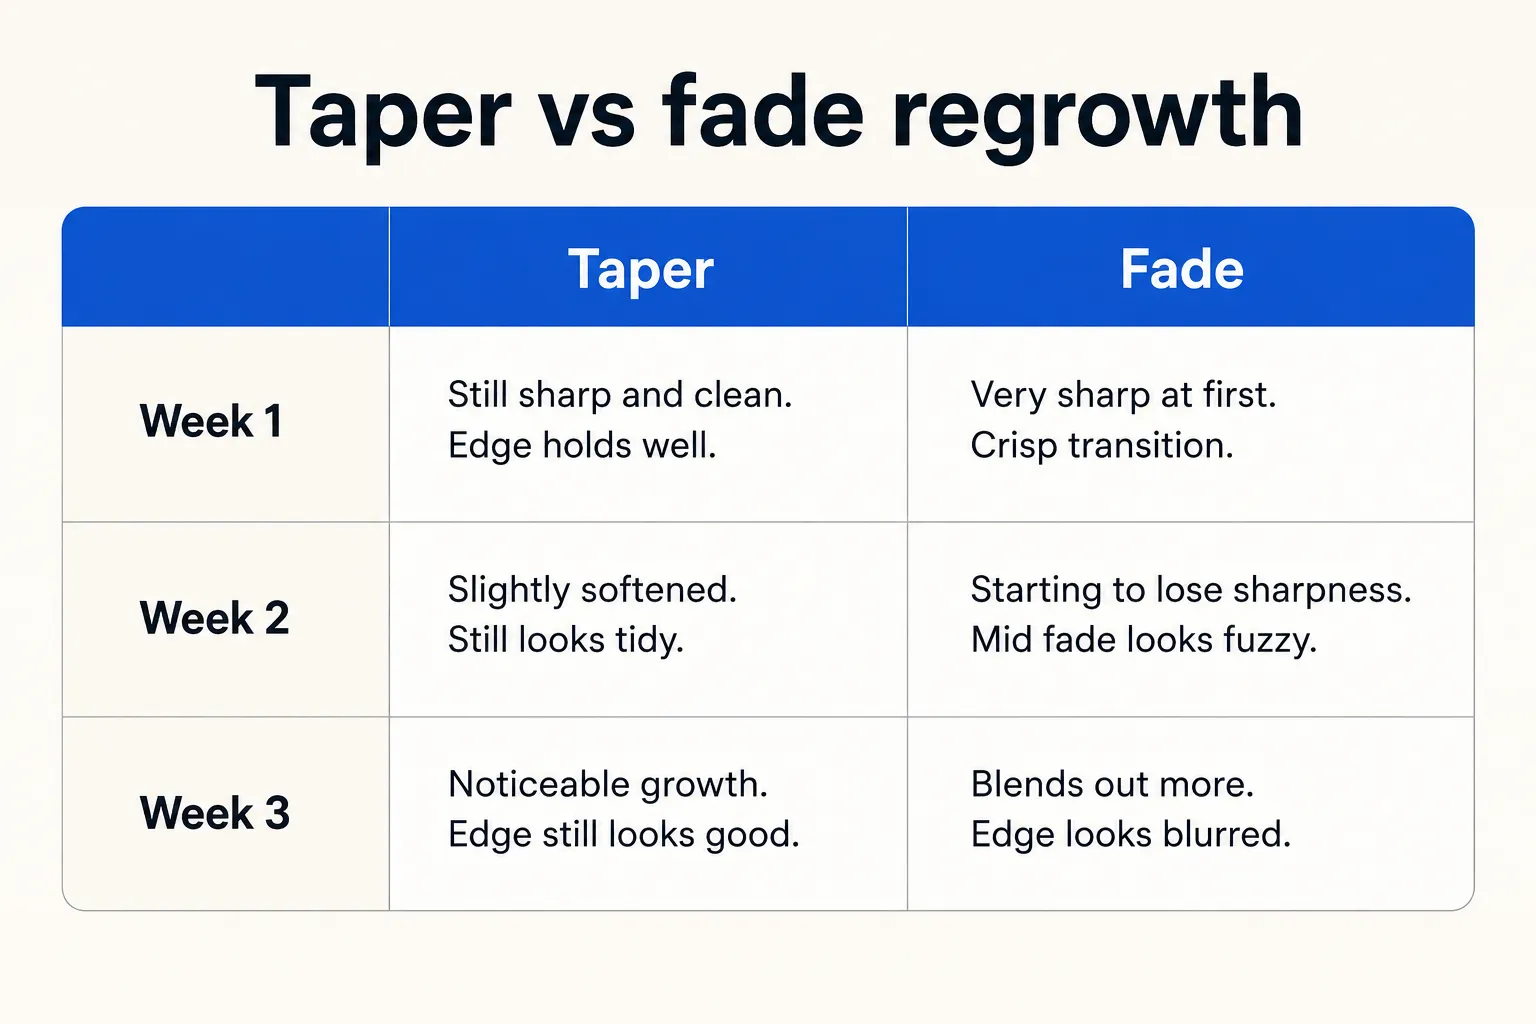
Here is the honest decision, with one limitation stated up front: a true high or skin fade is genuinely harder to self-do than a taper, so if you want maximum contrast, that is the one worth a barber visit.
Question | Beard taper | Beard fade |
|---|---|---|
Blends to skin? | No, keeps a short edge | Yes, edge goes to skin |
Contrast | Soft, low | Sharp, high |
Upkeep interval | Roughly 3 weeks | Roughly 1 to 2 weeks |
Self-do difficulty | Beginner-friendly | Harder, especially high |
Choose a taper if you want a low-maintenance, natural gradient that flatters most faces. Choose a fade if you want bold, barbershop-sharp contrast and do not mind more frequent touch-ups.
Low, Mid or High Taper: Where It Should Start
A beard taper can start low, mid or high, and the height is simply where the gradient begins on your face. According to Live Bearded's fade tutorial, a low taper begins just above the neckline, a mid taper starts around the mid-cheek or the middle of the ear, and a high taper starts up near the sideburns for the boldest contrast.
Lower starts are softer and more forgiving, higher starts are sharper and expose more skin. If you are unsure, mid is the reliable default.
On our round-faced tester, a high taper read as harsh and drew the face narrower than he wanted, while a mid taper flattered him and kept the beard looking full up top. Height is a face-shape decision as much as a style one.
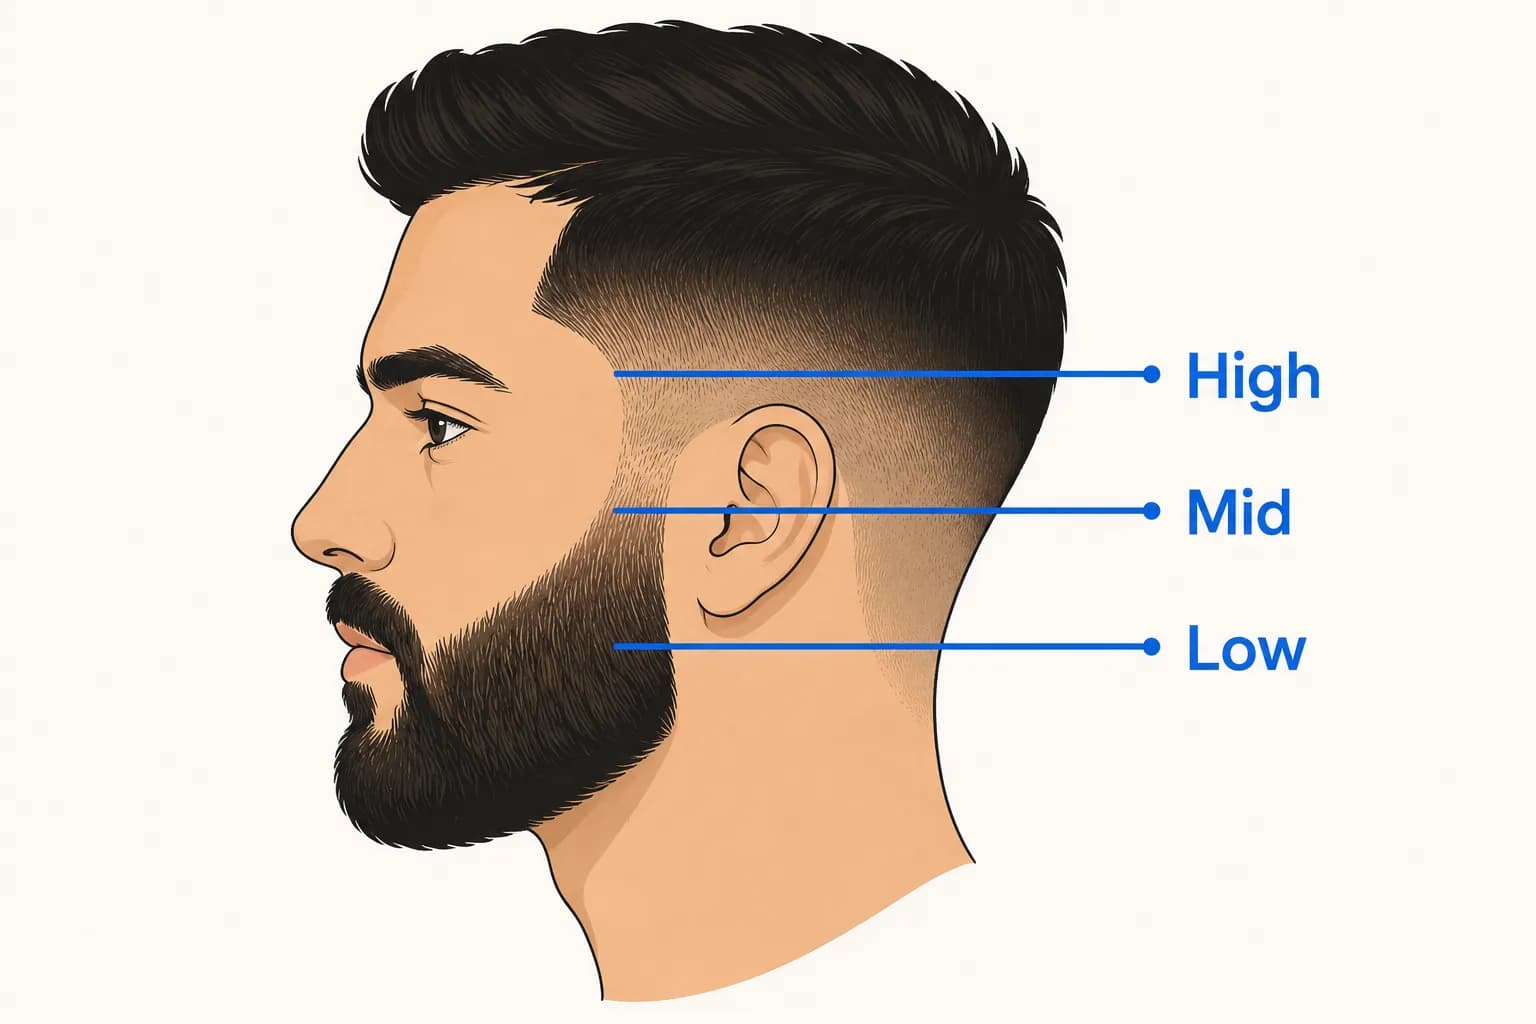
Pick low if you want subtle and office-safe, mid if you want balanced and versatile, and high if you want maximum contrast and do not mind the upkeep.
If your cheeks are patchy, an Italian fade approach helps: fade from the top down so the thin area blends instead of showing a hard line. Still choosing an overall look? You can browse the full styles gallery before you commit to a height.
What You Need Before You Start
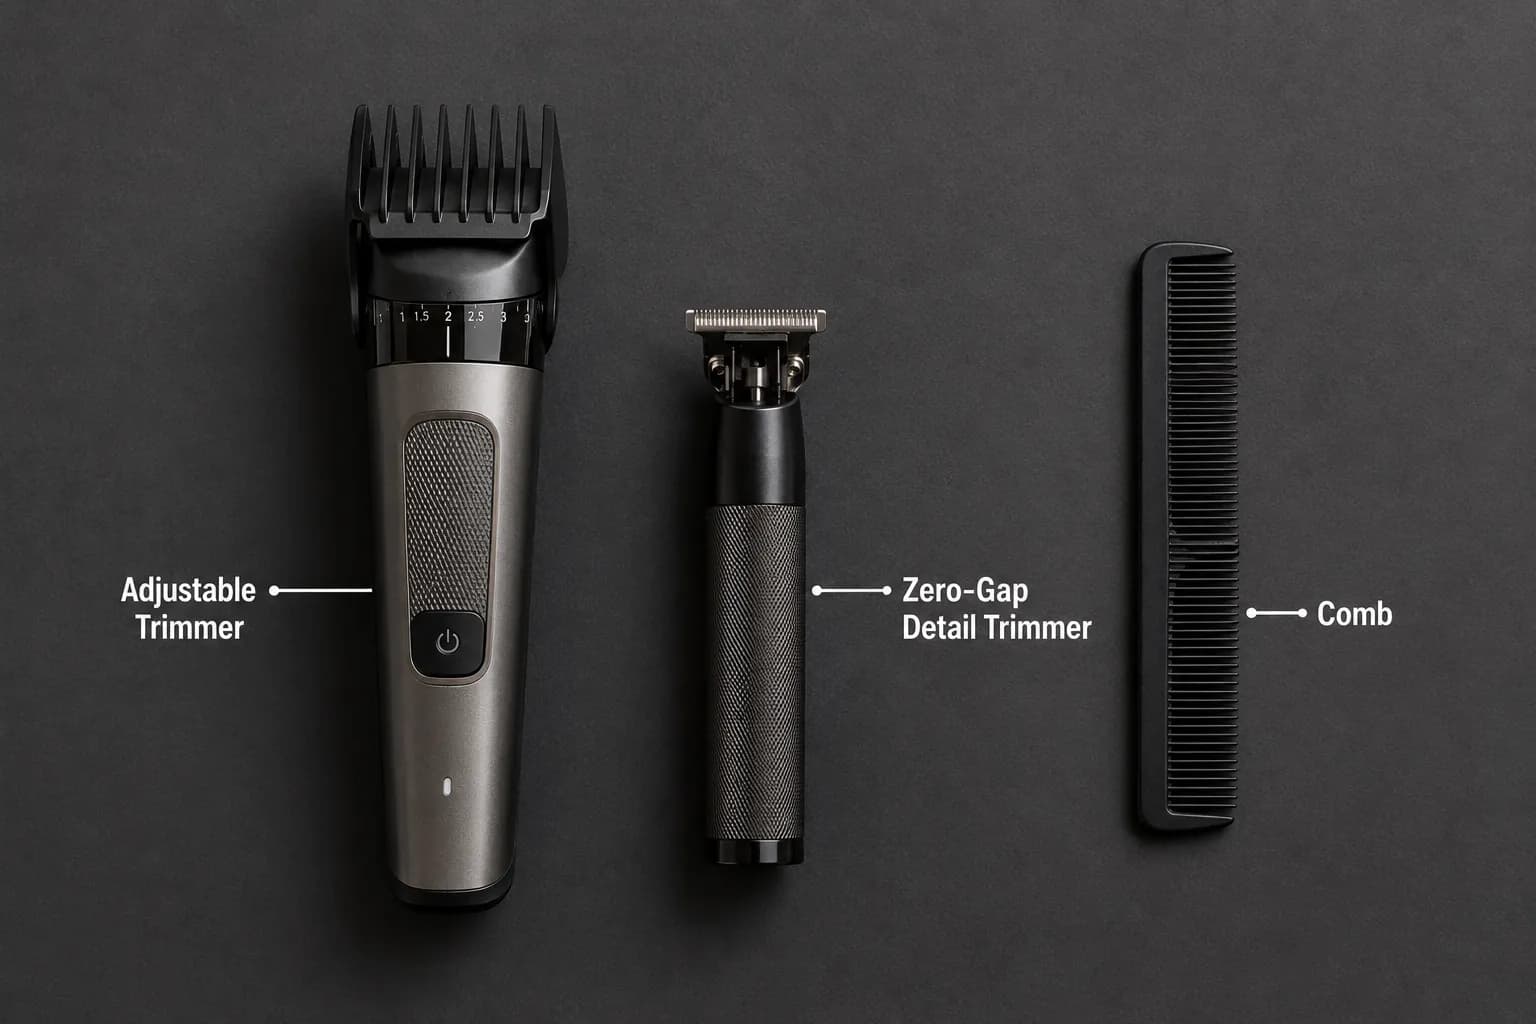
Tapering a beard at home takes surprisingly little gear, and none of it is brand-specific. You need one adjustable multi-guard trimmer for the gradient, one zero-gap or detail trimmer for the skin edge, a fine-tooth comb, and a good mirror (two mirrors if you want to see the neck).
The prep is simple but non-negotiable: wash, dry fully, and comb the beard out before you cut. Trim dry, because wet hair hangs longer and springs up shorter than you expect once it dries.
The two-trimmer point is one we learned the slow way. We first tried the whole taper with a single adjustable trimmer, and the skin edge stayed fuzzy and gray no matter how we angled it. Adding a zero-gap detail trimmer for the last few millimeters is what finally gave a clean edge.
Skin safety matters here because you will take the edge close. The American Academy of Dermatology recommends softening hair with warmth and moisture and moving with the direction of growth to cut down on irritation and nicks.
This taper method also slots into a wider routine, so if you want the full context, see the master trim guide for the complete face. One insurance rule before you start: leave it longer than you think, because you can always drop another guard, but you cannot add hair back.
The 4-Guard Step-Down Map
The core of a beard taper is a guard step-down: set your body length, then move the guard down one number at a time below your start line, covering a slightly smaller band with each pass. Per Wahl's guard guide, guard numbers map to fixed lengths and an upward blending motion softens the transition.
The single most common mistake is skipping a number, which leaves a hard step. Move four to three to two to one, then take the very edge to skin with your detail trimmer.
Guard sizes vary a little by brand, so verify yours before you commit. As a working reference, here is the map we used on the panel.
Pass | Guard | Approx. length | Where it goes |
|---|---|---|---|
Body | Number four | About 13 mm | Full beard, above the start line |
Step one | Number three | About 10 mm | Just below the start line |
Step two | Number two | About 6 mm | A narrower band lower down |
Step three | Number one | About 3 mm | Narrower still, near the edge |
Edge | Zero-gap | About 0.4 mm | The final skin blend |
Follow the sequence in order:
Trim the whole beard to your body length with the number four.
Mark your start line from the height you picked (low, mid or high).
Run the number three in a band just below that line.
Drop to the number two and cover a smaller band lower down.
Drop to the number one for a thin band near the edge.
Switch to the zero-gap trimmer and clean the skin edge.
Flick the trimmer upward through each seam to blur the lines.
When we jumped straight from a three to a one to save time, it left a visible shelf. Adding the number two pass back in, then flicking upward through the seam, erased it completely.
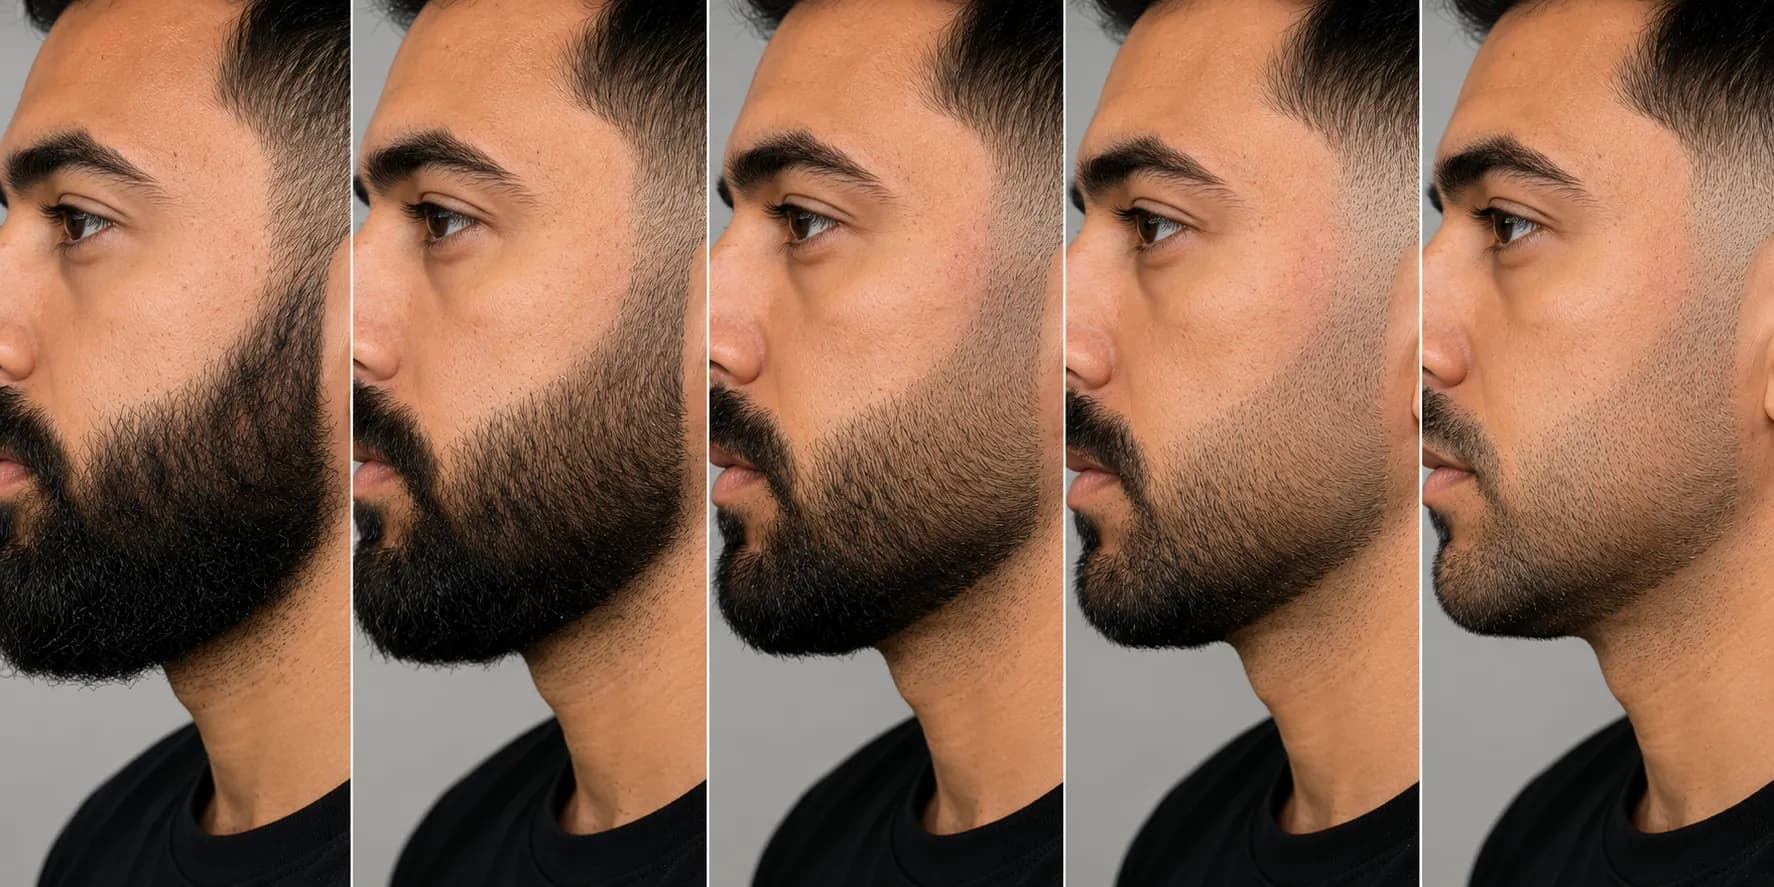
If the guard numbers on your trimmer are confusing, it helps to know what each guard length means before you start stepping down.
How to Taper the Cheeks
Tapering the cheeks is where a beard taper becomes visible to everyone else, so it rewards a light touch. Find your cheek line first and do not drop it too low, because you want the beard to stay full up top and only blend near the edge.
Then apply the step-down as short bands from the cheek line downward. The Beard Club's taper method uses a strip one guard down, then a half-strip one guard lower, and cutting with the grain for a subtler gradient. Protect your mustache connectors while you work.
On the cheek specifically, grain direction changed the result more than we expected. Cutting against the grain looked choppy and patchy, while cutting with the grain gave a softer, more gradual fade on the same tester.
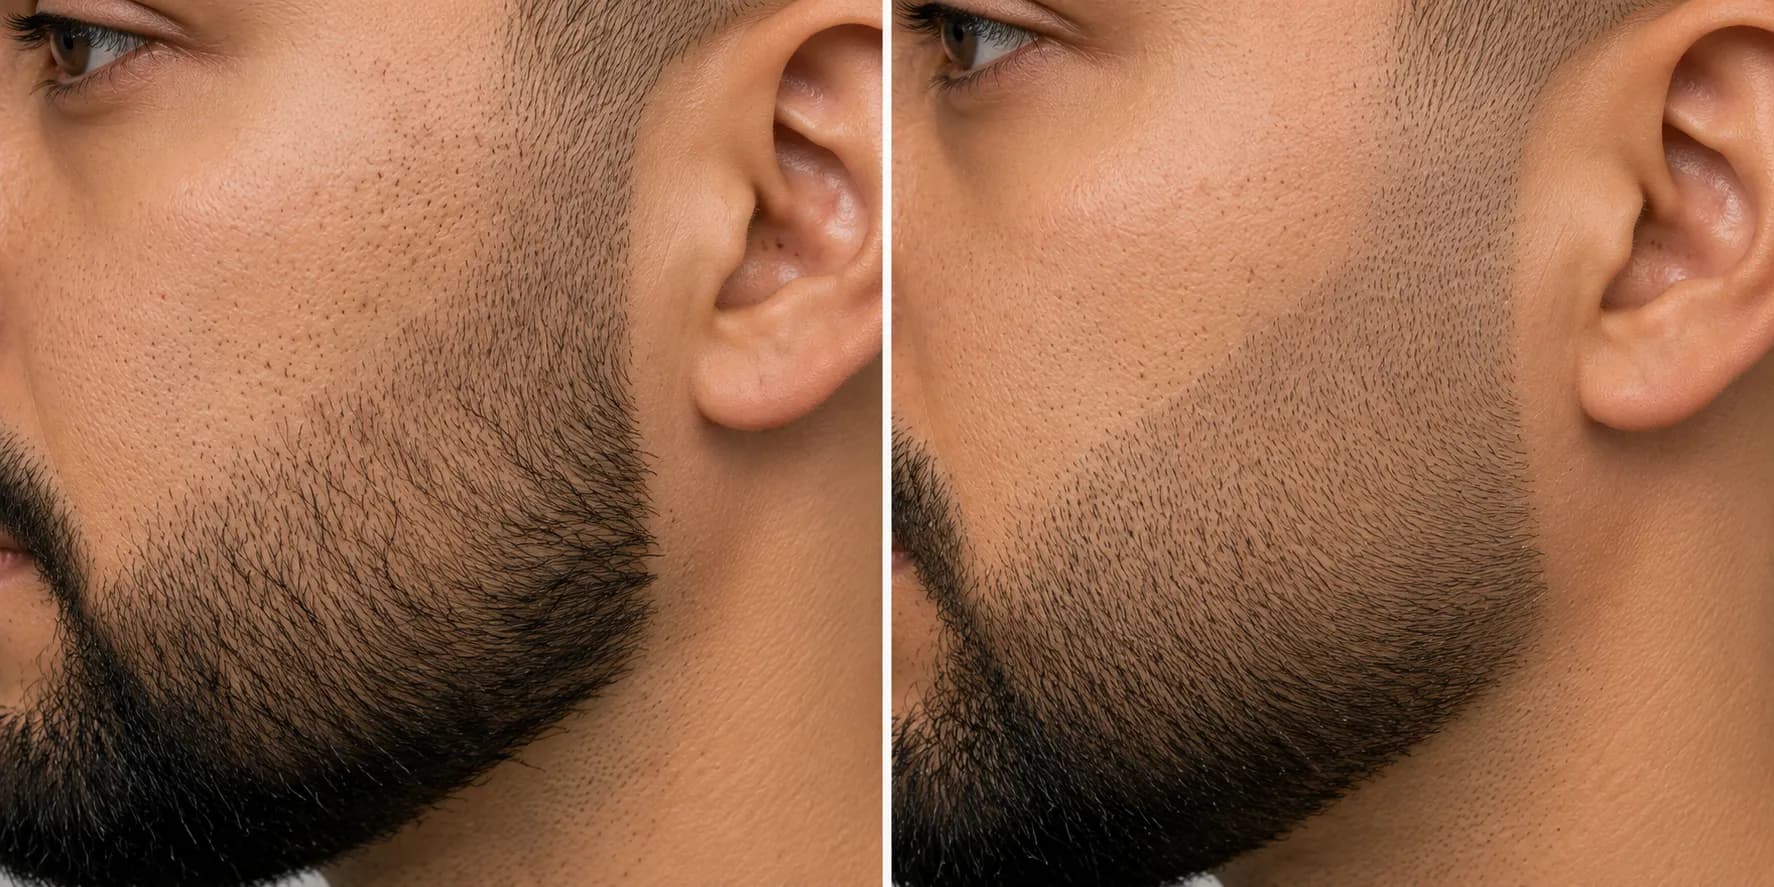
A quick trust note: the cheek line is one of the few edges that is hard to raise back once you drop it, so start conservative. A trimmer that fades cleanly makes the cheek gradient far easier to control.
Blend the Sideburns Into Your Hair
The sideburn junction is where a taper either looks intentional or looks disconnected. The goal is simple: match the top of your beard taper to the hair length where they meet, then blend upward with a flicking motion so the two connect without a shelf.
When they meet at different lengths, you get a hard line that reads as a mistake rather than a style. Get the lengths close first, then soften the seam.
We proved this the hard way. Leaving the sideburn one guard longer than the surrounding hair created an obvious step, and matching the two lengths fixed the disconnect instantly.
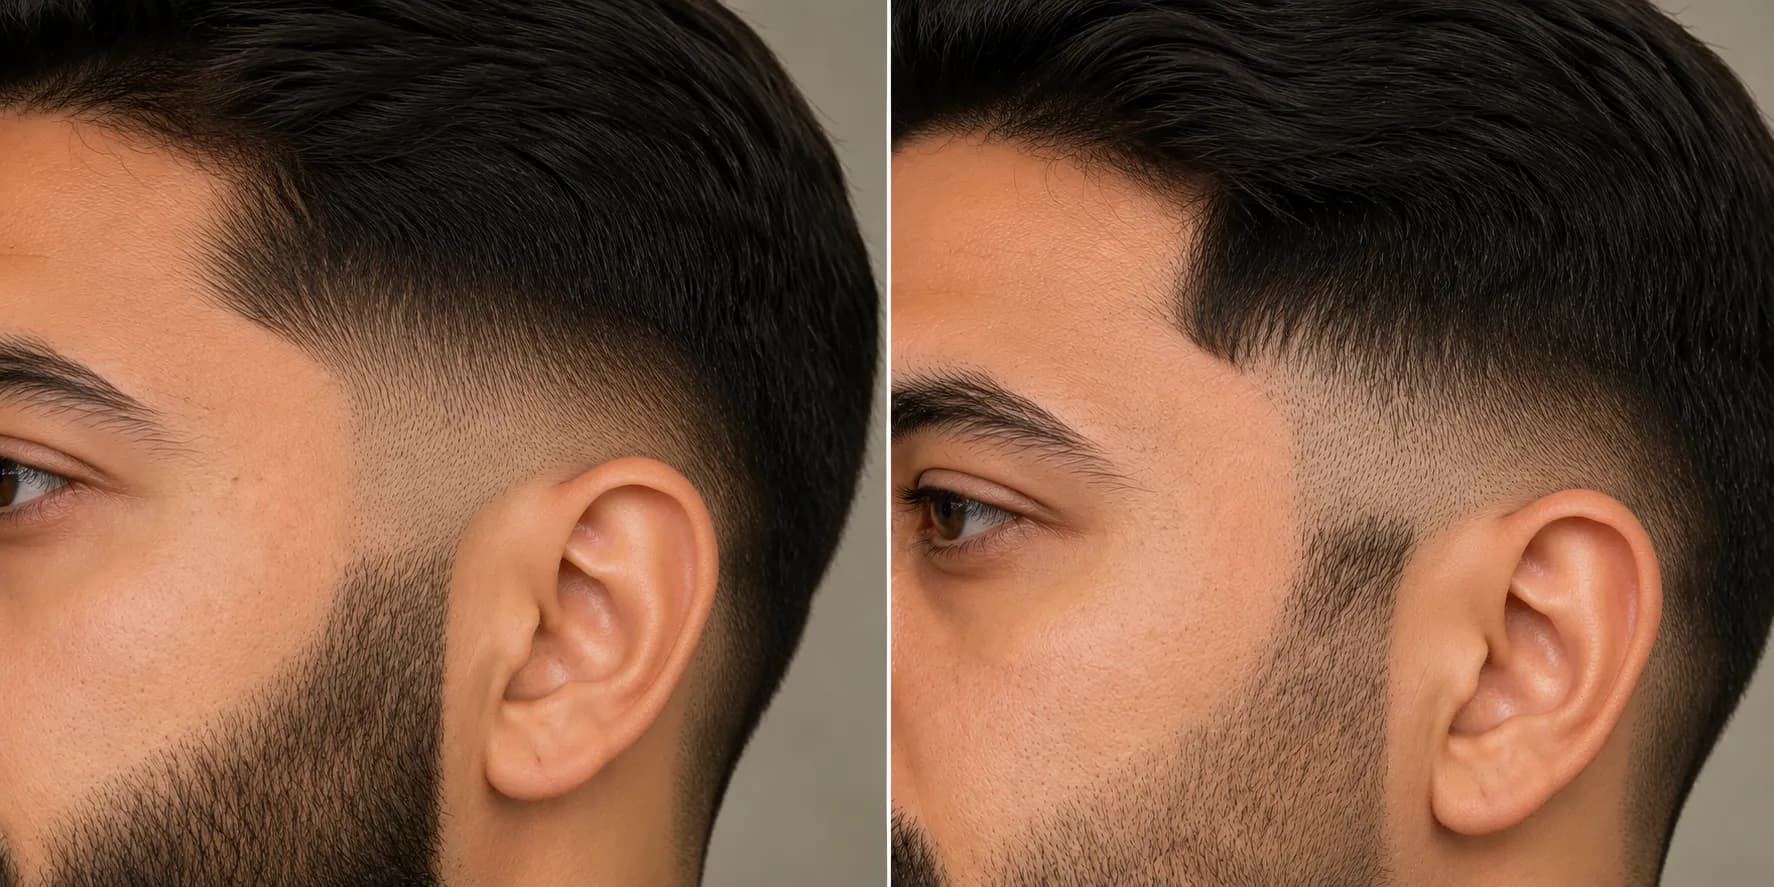
If your head hair is also faded and you want the full vertical blend, follow the dedicated step-down method for fading sideburns into your hair. One honest aside: a fully disconnected look, where the beard and hair meet at a deliberate hard line, is a valid choice, not a failure. Just make it on purpose.
How to Taper and Fade the Neck
Tapering the neck is what stops your beard from ending in an abrupt block under the jaw. Find your neckline about a finger's width above your Adam's apple, then step the guard down from the jaw toward that line, taking it to skin below it.
Fade the transition rather than hard-lining it, so the beard exits into the neck naturally. This is also the zone where the secondary look people search for, a beard neck fade, comes together.
On our panel, a hard-lined neck looked boxy and dated, while fading the last inch or so into the skin looked far more natural on the same face.
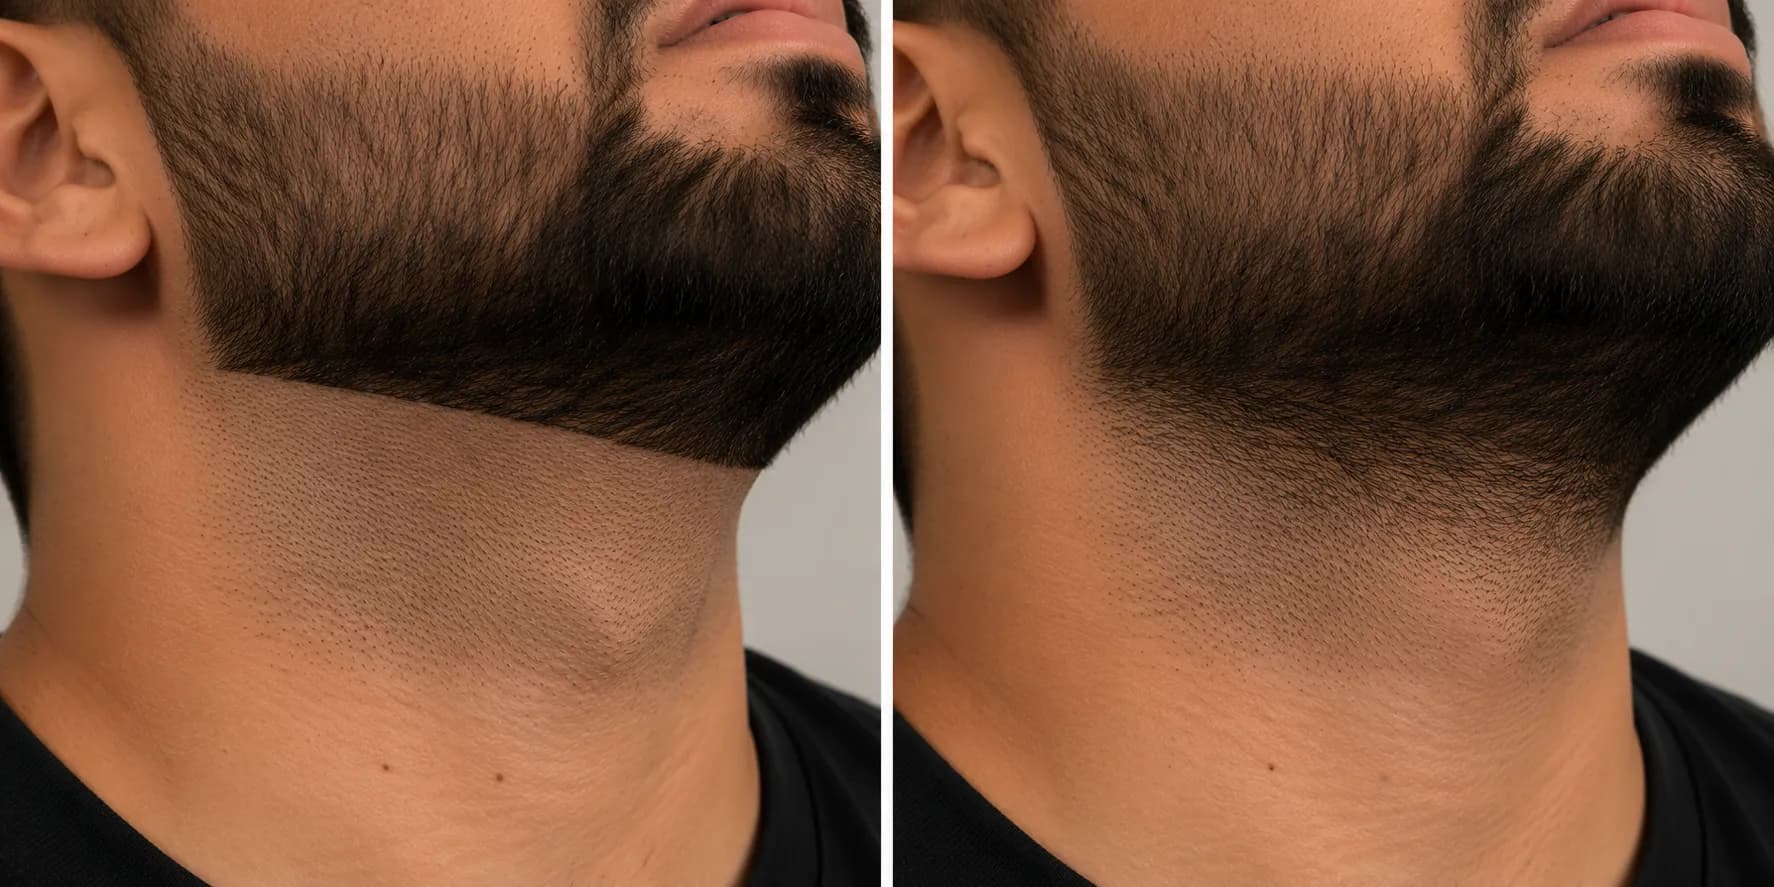
Skin safety is highest here because you are shaving close to bare skin. Dermatologists at the AAD note in their razor-bump prevention guidance that going against the grain increases irritation and ingrown hairs, so move with the grain and use a sharp blade. The same neck-taper logic scales up when you are tapering a long beard, where the exit matters even more.
How Do I Fix a Puffy Bowl Beard With a Taper?
A beard looks puffy or bowl-shaped when the sides stay too full for the taper, so there is no real gradient, just bulk that flares out at the bottom. The fix is a taper problem, not a length problem.
Drop the sides one more guard than you think you need, or, as the r/BeardTalk crowd puts it, put the clipper down and use scissors over a comb to thin the corners. Then re-blend upward with a flicking motion so the newly shortened sides melt into the top.
Our medium-length tester had a classic bowl until we dropped his sides from a three to a two and scissored the flare at the corners. The silhouette went from round to tapered in one short session.
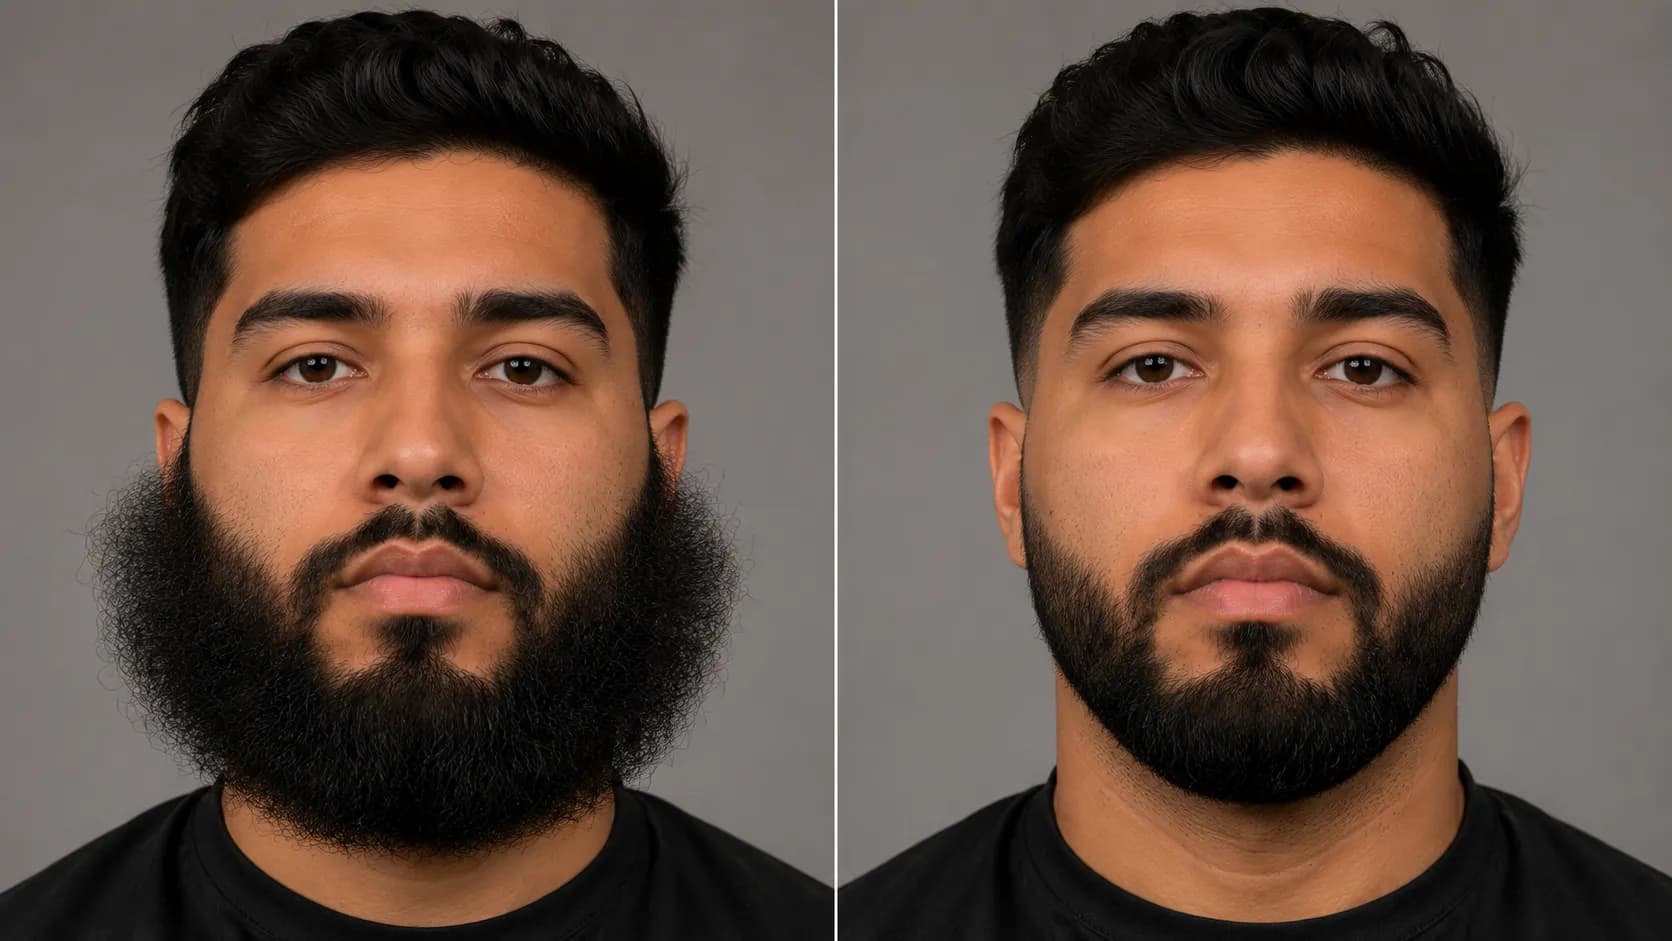
For upkeep, cadence follows growth. Healthline puts facial-hair growth at roughly 0.3 to 0.5 mm per day, which is why a light touch-up every couple of weeks keeps the gradient sharp, and the skin edge is the part you will refresh most often. One caution: over-correcting thins the sides fast, so take one guard at a time and stop sooner than feels natural.
Beard Taper FAQs
What is a beard taper?
A beard taper is a gradient that blends your beard from full length at the jaw down to short or skin at the edges. It is softer and lower-contrast than a fade, and you build it by stepping the guard down one number at a time across the cheeks, sideburns and neck.
Is a fade or a taper easier to do at home?
A taper is easier and more forgiving for beginners because it keeps some length at the edge instead of demanding a clean blend to bare skin. A full high or skin fade is the harder self-job and the one most worth a barber visit.
How often should you re-do a beard taper?
Plan on a light touch-up every couple of weeks, since facial hair grows around 0.3 to 0.5 mm per day. The skin edge blurs first, so refresh that most often and re-blend the sides as they fill back in.
Do you need two trimmers to taper a beard?
Practically, yes. One adjustable multi-guard trimmer builds the gradient, and one zero-gap or detail trimmer cleans the skin edge that an adjustable alone leaves fuzzy.
How do you stop harsh lines when tapering?
Never skip a guard number, because jumping lengths is what creates hard steps. Cover a smaller band with each pass and flick the trimmer upward through every seam to blur the transitions.
Bringing It Together
A clean beard taper is less about barber-grade skill and more about restraint and sequence. Set your body length, pick a height, then step the guard down one number at a time across the cheeks, sideburns and neck, and let the gradient build itself. The men on our panel who stopped forcing a single dramatic pass got a better blend in less time, and the puffy bowl that scares most people off turned out to be a one-guard fix. Keep the two-trimmer kit close, refresh the edge every couple of weeks, and the modern gradient look holds without a chair visit. Do that, and your beard taper reads as intentional every single day.
Summarize with AI
Keep reading
Related articles
 Styles, Shapes & Length Guides
Trim your beard dry so it dries even; wet hair stretches then shrinks. Go wet only for a razor lineup in the shower, plus wash and comb order.
 Styles, Shapes & Length Guides
Set your stubble to one even length across three tiers (light, medium, heavy mm), fix the patchy jawline, and learn how often to re-cut for a clean 3-day look.
 Styles, Shapes & Length Guides
Keep the sides short and the chin long — the opposite of a haircut — to slim a round face. A barber-reviewed shaping guide by face shape, with before/after.
 Styles, Shapes & Length Guides
Trim lines and flyaways, not length, to stay sharp while growing your beard. A barber-reviewed 4-stage timeline to grow out without losing an inch.
Comments
Moderated for quality. Share a correction, ask a follow-up, or tell us what worked for you - every comment is reviewed before it goes live.